There are many reasons you might want to change your Facebook page name. Maybe you created your page when you first started and your business has since grown.
Or maybe you rebranded, and you want your page name to match your new identity. Whatever the reason, changing your Facebook page name is relatively easy to do.
If you want to change your Facebook page name, but Facebook does not allow you to change your Facebook page name, then here we are able to give some tricks to change your page name easily.
Change Facebook Page Name
Going back two years, Facebook allowed admins to change their Facebook page name before the page reached 200 likes. Once the page had 200 or more 200 likes, it was nearly impossible for the admin to change the page name. Now the trend has changed, and to overcome such limitations, we will share the trick to changing page names on Facebook.
We are sure you must have tried earlier as well to change the page name, but alas! You must have encountered an error, and therefore you are here. In the post, we will also highlight the common troubleshooting and errors faced while changing the Facebook page name.
Page Name or Username?
Guys, it’s high time we clear the doubts between the two since many Facebook page admins are confused between the two. Your page name and username are different things; the page name can be seen from under the profile picture or, let’s say, DP. The user name, also known as the URL or the address of the Facebook page, can be seen beneath the page name.
In short, the page name means the title and the username are the address of your FB page. When someone tags your page, your page name will appear as tagged but not your username.
Also Read: How to Download Facebook Videos on Android and iOS
Steps To Change Facebook Page Name?
Step 1: Open Facebook and log in to your account. Make sure you have admin access to the page whose name you want to change.
Step 2: Go to your Facebook page by clicking on the Pages tab in the left sidebar or by typing the page name in the search bar at the top.
Step 3: Once you’re on your Facebook page, click on the “Settings” tab located at the top-right corner of the page. It looks like a gear icon.
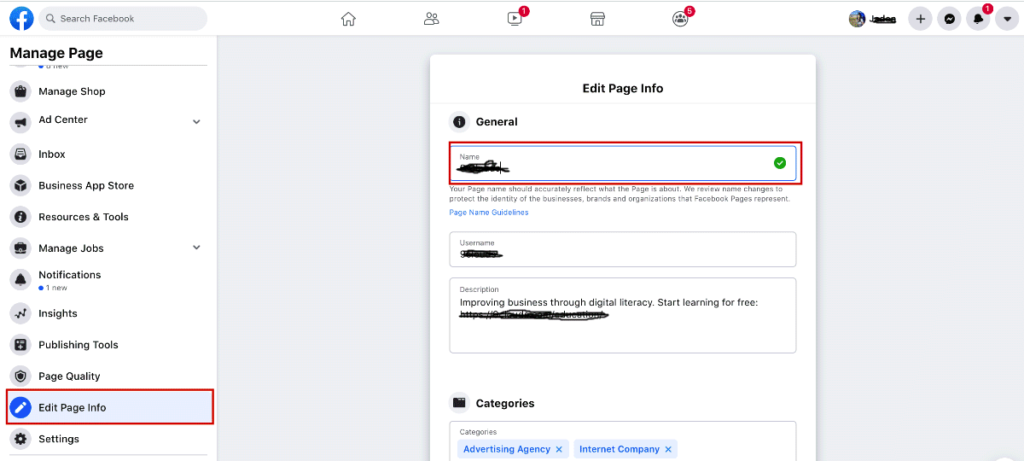
Step 4: In the “General” section of Settings, you’ll see the current name of your Facebook page. Next to it, you’ll find an “Edit” option. Click on the “Edit” link.
Step 5: A new window will appear with options to edit your page’s name. In the text box, enter the new name you want for your page. Make sure to choose a name that complies with Facebook’s guidelines, as they have certain restrictions on what can be used as a page name.
Step 6: After entering the new name, click on the “Continue” button. Facebook will review the name change request, and you may be asked to provide additional information to support your request.
Step 7: In some cases, Facebook may ask you to upload documentation, such as a business license or official document, to verify your request. If requested, follow the on-screen instructions to provide the necessary documents.
Step 8: Once you’ve submitted your name change request, you’ll receive a notification from Facebook stating that they are reviewing your request. This process usually takes a few days, but it can sometimes take longer.
Step 9: Keep an eye on your notifications and email associated with your Facebook account. Facebook will contact you regarding the status of your name change request. They may ask for additional information or notify you when the change has been approved.
Step 10: If your name change request is approved, you’ll receive a final notification from Facebook confirming the change. The new name will be immediately visible on your Facebook page.
Note: If your name change request is denied, you can try again with a different name, making sure it complies with Facebook’s guidelines. In case you encounter any issues during the process, you can reach out to Facebook’s support for further assistance.
Name Change Denied? Why?
If not an error, then the chances are you will be denied for changing the Facebook Page name, making you wonder all the time why Facebook did so. There is, again, a set of rules and guidelines to be followed designed by the Facebook team.
- You might have violated the rules set by the Facebook team. Facebook does not allow or entertain abusive terms or phrases in the Facebook page name. If your newly changed name request includes words that are against someone’s rights, your request to change your Facebook page name will be denied.
- Ensure there are no grammatical errors like capitalisation of the letters, symbols or improper punctuation.
- Do not enter the long slogan or descriptive page name. Try to keep it short. The description can be entered into the About section of the page.
- If you are using the word “Facebook,” make sure you do not make any variations on it. To learn more, check out Brand Resources.
- Do not use such words, which can mislead the audience, thinking it is an official Facebook page.
- From the verification process, the team ensures no fake Facebook pages or names.
- Do not only include generic words like Cricket. The page should be managed and handled by the official, authoritative team or person related to the topic.
- Kindly do not create the name based on a generic geographical location like California. You can make the unique one that includes the generic geographical location name, like Citizens of California, CA.
For all these changes, Facebook takes some time to make on the page because of the verification process and trying to check for the need for the request. We have often observed that when the business-related Facebook name is changed to the new one, Facebook takes time and views no connection between the old and new names. To overcome this limitation, you can first change the username (the address of the Facebook Page name must match the original name of the Facebook page), which requires no verification, and then submit it for the change of the page name. This solution should work since it has many users and admins.
Conclusion
There can be many legitimate reasons for changing your Facebook page name. In this post, we have discussed various methods that you can use to change the name of your Facebook page. But you have to be careful of choosing the appropriate names as you cannot use various names as mentioned in the post above.